Freezing Fresh Herbs

Freezing Fresh Herbs

Growing herbs is an easy way to get started with gardening and is often one of the easiest types of plants to grow.  Herbs can grow fast and if you are not using them frequently, they may go to waste. Freezing frozen herbs is a quick and easy preservation method.

There are many ways to preserve herbs so that you can enjoy fresh herb flavors all year round. Drying herbs is not the only method for preservation. One method that is quick and easy and does not require a ton of extra tools or equipment is freezing.  Freezing herbs is essentially making herb ice cubes for use in cooking later in the year.


mint extract pin

Types of Herbs to Freeze

There are many different kinds of herbs that you can preserve with the freezing method, as well as several different freezing methods that can be utilized.  The delicacy of the herb’s leaves can cause some herbs to freeze well in water while others freeze better with flash freezing.

Some of these herbs are:

  • Basil
  • Lemongrass
  • Mint
  • Oregano
  • Sage
  • Dill
  • Chives
  • Thyme
  • Tarragon

Your 1st Step to a Simple Living Lifestyle!

A great place to start with Simple Living is to start making your own cleaning and personal products!

With this FREE eBook, you can easily get started with over 10 quick but effective recipes that use ingredients you already have in your house!

Flash Freezing Method

The flash freezing method is so easy and can be applied to so many fruits and vegetables.  I use this method when I am freezing bananas and strawberries that are past thier prime for use in smoothies.

I also use this method for vegetables, like tomatoes and peppers that have ripened but I do not have enough to make an actual batch of sauce or salsa.

Flash freezing is simply just laying the fuit, vegetables, or herb leaves out flat on a cookie sheet and popping them right in the freezer for a few hours. Once frozen you can relocate them to a freezer bag for long term storage.

The flash freeze method is a great candidate for freezing herbs like dill, mint, basil, oregano, and cilantro.

Freezing Herbs in Water

Freezing herbs in water is an awesome option for herbs such as mint, lemon balm, lavender, and other dried flowers.

This method is so easy, just put the herbs or flowers into the ice trays and fill with water.  Put the ice cube trays in the freezer and let sit until completely frozen.  

Herb ice cubes are awesome to add to a pitcher of iced water, lemonade or punch.  Utilize these ice cubes all year round for a fresh and pretty touch to your holiday cocktails and punch!

Freezing Herbs in Oil

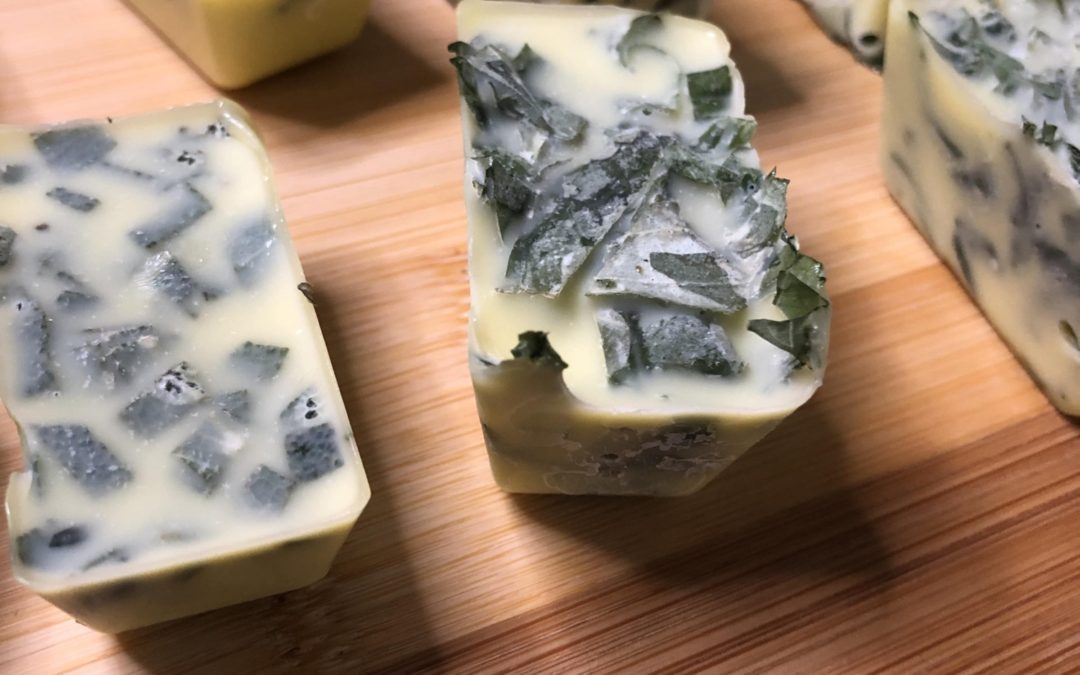
For herbs that you will use in cooking such as you can chop them and freeze in olive oil instead of water! This works wonderfully with herbs like sage, oregano, thyme, and basil.

Measure out 1tsp or 1Tbl of chopped herbs, the measurement for chopped fresh herbs is the same for chopped frozen herbs, and add to ice cube tray.  Fill ice cube trays with olive oil and place in the freezer.  After frozen solid, you can remove from tray and place in freezer bag for long term storage.


Your 1st Step to a Simple Living Lifestyle!

A great place to start with Simple Living is to start making your own cleaning and personal products!

With this FREE eBook, you can easily get started with over 10 quick but effective recipes that use ingredients you already have in your house!

Storing Frozen Herb Cubes

As mentioned above, once herb leaves or herb cubes are frozen completely, you can transfer them to plastic ziplock freezer bags for long term storage.

This option allows you to utilize space in your freezer and to continue using the ice cube trays to make more frozen cubes as your harvest continues!

These cubes should be good for quite a while, up to 12 months which is great for getting fresh herb flavor even in the winter months.

Herb Freezing Method Instructions

Step 1. Harvest the herbs

Harvest herbs from the plant by cutting the stems from the plant.

There are correct ways of pruning your herb plants when harvesting in order to encourage more growth on the plant.  This depends on the plant and depends on if you are done for the year or still plan on harvesting.

Step 2. Wash leaves and pick leaves from the stems.

Rinse the harvested stems and leaves to remove any dirt or bugs. Dry leaves thouroughly and disgard the stems.

This is a great job for little kids!

mint leaves

Step 3. Crush or chop the herb leaves

For herbs in oil, coarsely chop the herb leaves with a sharp knife.

If you are flash freezing the leaves, just place whole leaves on the cookie sheet and place in the freezer.

When prepping mint or lemon balm, you can stick with whole leaves to be frozen in water for drinks.

chopped mint leaves

Step 4. Measure out your desired amount of herbs per cube


The measurement of fresh herbs is the same as frozen herbs.  You can make whatever ratio of herbs to water/oil as you would like, just take note of the herb measurements, 1tsp or 1 Tbl so that when adding to a dish, you know what you are working with.  

Add the chopped herbs to the ice cube trays.

mint leaves in tray

Step 5. Add water or oil to your ice cube trays

Fill each ice cube containing herbs with either water or olive oil.  Make sure that the herbs are submersed as well as possible. 

herbs in oil

Step 6. Place in freezer

Once put together, you can place the ice cube trays or cookie sheet in the freezer.  Allow to freeze for several hours until frozed solid.

Step 7. Remove from freezer and transfer to freezer bags

Once frozen solid, remove from ice cube tray and transfer to freezer bag for long term storage.  Make sure you are using freezer bags and not regular storage bags to make sure that you are not getting freezer burn.

Step 8. Use in cooking all year round

Add olive oil cubes to your cooking when making sauces, sauteing vegetables, roasted vegetables or meats.  Add your ice cubes to punch, lemonade, cocktails any drink that could use an extra bit of pizazz!

There are so many possibilities!

Your 1st Step to a Simple Living Lifestyle!

A great place to start with Simple Living is to start making your own cleaning and personal products!

With this FREE eBook, you can easily get started with over 10 quick but effective recipes that use ingredients you already have in your house!

How to Use Frozen Herb Cubes

Directions

Step 1: Harvest the herb leaves.

Step 2: Wash leaves and remove from stems.

Step 3: Crush or coarsely chop herb leaves.

Step 4: Measure out your desired amount of herbs per cube.

Step 5: Add water or oil to your ice cube trays.

Step 6: Place in freezer.

Step 7. Remove from freezer and transfer to freezer bags.

Step 8. Use in cooking all year round.

Your 1st Step to a Simple Living Lifestyle!

A great place to start with Simple Living is to start making your own cleaning and personal products!

With this FREE eBook, you can easily get started with over 10 quick but effective recipes that use ingredients you already have in your house!

Homemade Mint Extract

Homemade Mint Extract

Do you have an abundance of mint?

Mint is one of those plants that while extremely useful and great to grow, can take over other plants due to its ability to grow with little maintenance.

We have always been successful in growing mint, it does really well in most environments.  Even when mint starts to struggle, little adjustments to the amount of sunlight, heat, water, etc can bring it back pretty easily.

For this reason, it is very easy to end up with an abundance of mint in the summer.  Aside from drying or freezing, another great method for preserving mint for use the rest of the year is by making an extract.

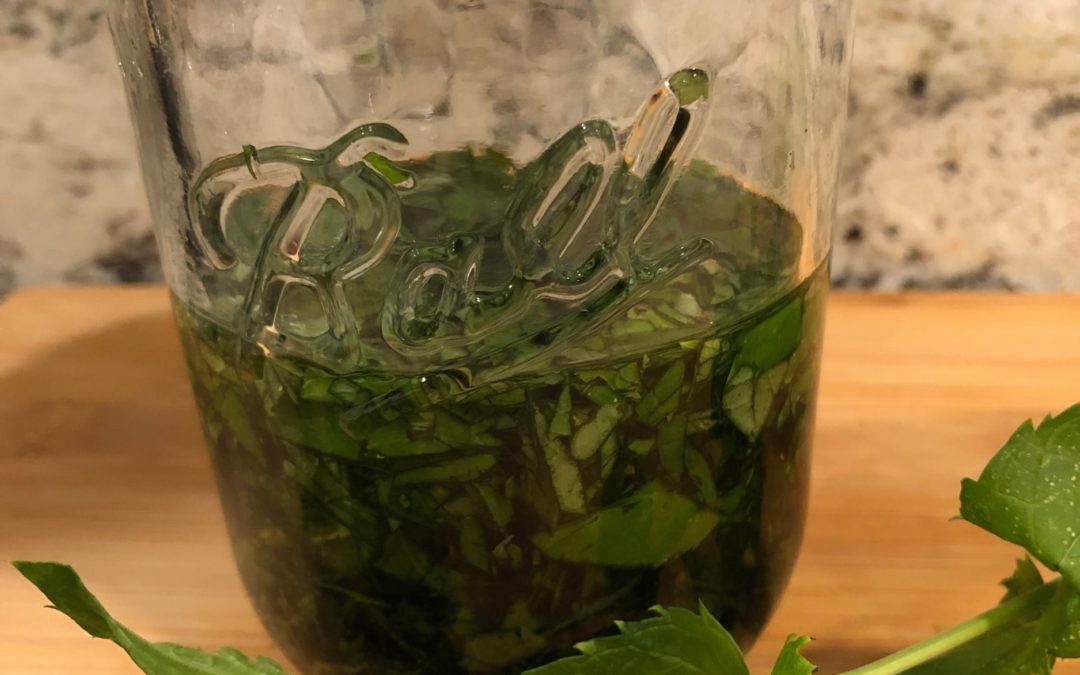
mint extract pin

What is an extract?

An extract is a preservation method in which you are soaking your intended harvest in alcohol in order to draw out all of the flavor and beneficial properties of the plant.

While you can buy different extracts at the store, they are also really easy to make at home.  Vanilla and mint are some of the most common variations but you can make an extract with many plants that you harvest.

Why make a mint extract?

Extracts have many uses, particularly in baking and cooking.  Many holiday baking recipes call for mint extract.

You can also use it for cocktails and alcoholic drinks that require a minty flavor.

Mint extract can also be a really nice gift if you package it in a cute jar.

What kind of mint?

You can really use any type of mint you have growing as there are a ton of different varieties.

My favorite is Spearmint but you could always use varieties such as chocolate, lemon, orange, etc.

What type of alcohol?

You can really use any alcohol to perform an extraction but the best would be a clear alcohol such as vodka.

I definitely recommend that you a cheap alcohol for this, especially if you are only using the mint extract for cooking.


Homemade Mint Extract Recipe

Step 1. Harvest the mint

Harvest mint from plant by cutting the stems from the plant.

This is really a great way to preserve your mint leaves.  You can do it in a large batch which will use up a large amount of leaves.

Step 2. Wash leaves and pick leaves from the stems.

Rinse the harvested stems and leaves to remove any dirt or bugs. Dry leaves thouroughly and disgard the stems.
mint leaves

Step 3. Crush or chop the mint leaves

Coarsely chop the mint leaves with a sharp knife. You can even use whole leaves without chopping, just make sure that you crush them to release the mint oils
chopped mint leaves

Step 4. Mix alcohol and mint

Combine your choice of consumable alcohol, preferably a clear alcohol with the chopped mint.  Vodka works best.  This is a great project to use your cheaper alcohol.

There is not an exact ratio, it will depend on your preference. For the batch in the pictures, I used 1/4 cup mint leaves to 3/4 cups of alcohol.  Consider what volume of extract you need and go from there. Add as much mint as needed for the desired flavor. It may take a few batches to get a flavor that you like.

Just make sure that there is enough alcohol to cover the leaves so that mold does not start growing.


mint extract ingredients

Step 5. Place tightly sealed glass jar in a dark place.

Tightly seal a glass jar or container and store in a dark place for 1-2 months. Taste test after a month to check the flavor.

Step 6. Strain the mint leaves from the alcohol.

Once the desired flavor is achieved, strain the mint leaves from the alcohol.

Store the mint extract in a glass jar and use as needed.  You can also give them away as gifts!

Easy Homemade Mint Extract

Directions

Step 1: Harvest the mint leaves.

Step 2: Wash leaves and remove from stems.

Step 3: Crush or coarsely chop mint leaves.

Step 4: Add mint leaves to alcohol.

Step 5: Place tightly sealed jar in a dark place.

Step 6: Strain out mint leaves and enjoy!

Do you want a simple life? Don’t forget to get your free Simple Living Starter Kit now!

5 Common Vegetable Garden Problems and How to Solve Them

5 Common Vegetable Garden Problems and How to Solve Them

Having a successful, productive garden is so satisfying that I look forward to it every year.  Even though the harvest is always well worth it, each year there seems to be a new issue, problem, disease, or pest that requires some sort of treatment.

After many years of gardening, there are a few vegetable garden problems that I have come to expect or look out for which if caught early can be easily treated if not prevented all together.

This article will illustrate 5 common vegetable problems that you could face this year and how to properly treat them.

Dreaming of Having a Vegetable Garden this year?

Grab the Your Dream Vegetable Garden Plan for FREE to get you started today!  Start growing your groceries this year!

1. Powdery Mildew

powdery mildew
As one of the most common vegetable garden problems, powdery mildew is a white fungus that can affect the quality and quantity of the plant’s harvest of tomatoes, peppers, and zucchini.  It can affect many plants such as squash, pumpkins, melons, tomatoes, eggplants, pepper, beans, and peas.

Powdery mildew spreads by fungus spores being transmitted and carried through the air where it will then settle onto other plants. You can identify powdery mildew because the fungus gives the appearance that plants have been dusted with flour.  The white mildew sits on top of the plant leaves. In addition, once damage sets in, the leaves will start to turn yellow.

In order to treat, you can either use an organic fungalcide which can be found at local garden centers, or you can make a DIY version.  The DIY bicarbonate solution is easy to make and only takes four common ingredients: baking soda, vegetable oil, dish soap, and water.  This DIY recipe was taken from MIgardener with a few adjustments to make a smaller batch for my needs.

Mix 1 teaspoon baking soda in 1 quart of water.

Add 1 teaspoon of vegetable oil to help it stick to the leaves

Add 1-2 drops of dish soap.

Mix together and add to a spray bottle.

Spray infected plant, thoughroughly coating the leaves.

This is a great job for kids! Kids love spray bottles and because this such a safe formula, I usually just whip up a batch and let my kids go at it.

2. Cabbage Worms

cabbage worm
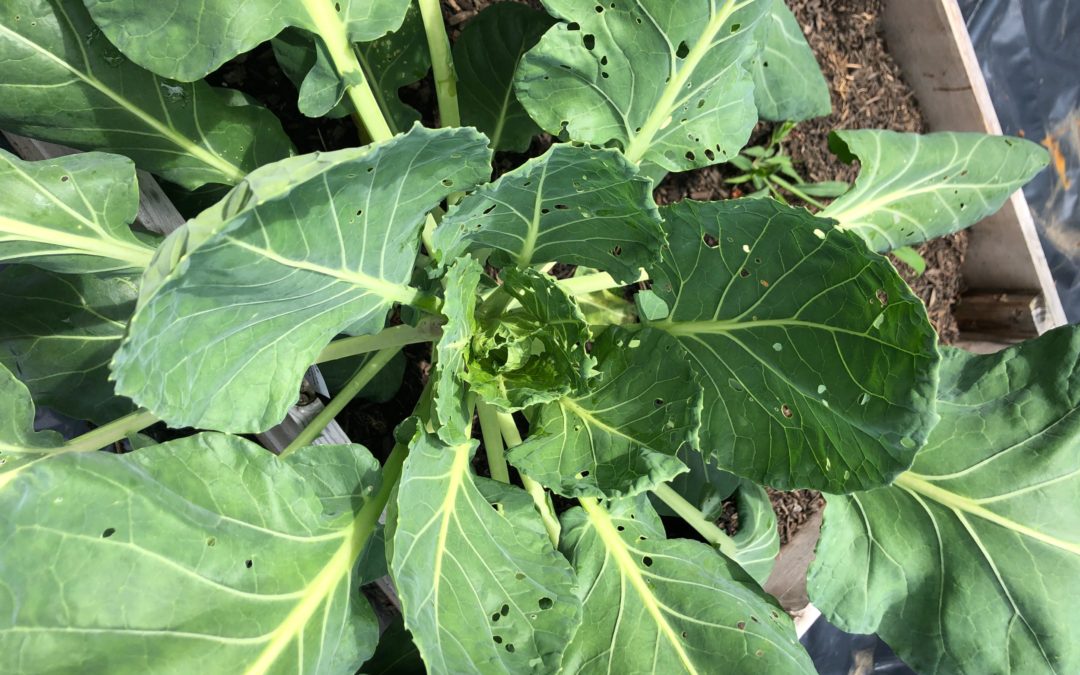
I have not had much luck in the past with brassica plants (broccoli, cabbage, Brussel sprouts, etc. ). Everytime I have planted them, they start off really promising and in what seems like overnight, have been ravaged by cabbage worms and are riddled with holes.  The only real solution for treatment is to manual pick the cabbage worms from the plants.  Once you get an infestation though, this is a very tedious task.

Cabbage worms is a blanket term for several different types of caterpillars/worms that are attracted to brassicas.  Cabbage worms and cabbage loopers typically refer to diamondback moth larvae and zebra caterpillars. The first indication that you have a cabbage worm problem is the appearance of small holes in the leaves.

The best way to deal with cabbage worms is to prevent it all together.  This can be achieved in several ways:

1) Utilize row cover over your broccoli, cabbage, brussel sprouts, etc.  These plants do not need pollination so covering them to avoid the moths laying their eggs to start, is a really great option.

2) After watering, sprinkle cornmeal onto the infested plants.  The worms will eat the cornmeal and die.

3) Use a store bought pesticide like Bt or Sevin.

For more information about battling cabbage worms, check out the very helpful article: The Old Farmer’s Almanac – Cabbage Worm Treatment


3. Leggy Plants

leggy plant
While a healthy plant will usually grow pretty quickly if it is being kept happy, sometimes when a plant grows quickly it can be because of insufficient care.

When a plant becomes “leggy” it refers to the plants growth.  Typically a leggy plant will have grown tall and have large spaces between leaf sets.  Initially it may look healthy because it has experienced rapid growth, but it is actually a sign that something in the care is lacking.

The majority of the time a plant will become leggy with it is not getting enough sunlight.  This forces the plant to reach in a direction to get the sunlight it needs. An easy way to treat and prevent this is to ensure that the plant is recieving enough direct sunlight. Move the plant to a sunnier spot in the garden or window sill.

Another possible cause of legginess is that the plant has been planted in soil which is too hign in nitrogen.  Nitrogen high enviornment can over promote leaf and greenry growth of the plant.  This will cause the plant to have increased growth of the greenery before the roots have had a chance to really be established, resulting in a leggy plant.

For new plants, make sure you are planting in soil sufficient with potassium, or upon observance of legginess, add potassium to the soil.

Another great treatment to legginess is proper pruning.  I experience this with my mint and basil almost every year.  The plant becomes leggy but after a good, proper pruning, the plant will fill out and start developing a more bushy apperance.


Stop wasting your fruits and vegetables!

Grab the Ulimate Fruit and Vegetable Seasonal Guide for FREE to start properly storing your produce so you can stop throwing it away and start enjoying it longer.

4. Blossom End Rot

blossom end rot
Blossom end rot is one of the biggest vegetable garden problems that I routinely face in my garden each year.  It can occur in zucchini, squash, tomatoes, or melons but I typically experience with my zucchini.

Blossom end rot results in a fruit forming but due to some reason, the plant is unable to continue the growth of the fruit and it starts to rot on the blossom end.  The fruit will stop growing and will turn yellow, brown, or black and begin to rot.

There are two common causes of blossom end rot:

1) Calcium deficiency in the soil

2) Inconsistent watering (Check out this helpful article on how to water properly)

Both of these can be treated but are also easily prevented.

In my experience, blossom end rot occurs because I do not water consistently.  In past years, I may not water for a few days and then blast the plants with a large dose of water or a large rainstorm will come through.  The easiest way to prevent this is to water frequently and consistently.

If a calcium deficiency is the cause of the blossom end rot, you can add calcium tablets and egg shells to the soil or add a calcium rich fertilizer either prior to planting in the spring or once you notice the issue.

You do not want to eat fruit that have blossom end rot but many times, it will only be a portion of the fruit that is produced, not every one.

5. Bacterial Leaf Spots

bacterial leaf spot
Bacterial leaf spot is a common disease that can be found in both household plants and garden plants.  Bacterial leaf spot occurs when a plant becomes infected by bacteria either through air transmission or through the soil.

Many times bacterial in the soil is splashed onto the leaves of the plant during watering.

Bacterial leaf spot causes black or brown spotting on the leaves and will eventually cause yellowing.

If caught early, a copper fungicide is a great treatment for killing the bacteria, however prevention is the best way to combat it.


I have come to realize after several years of gardening that I can expect certain issues to arise.  Learning what problems you are most likely to face only comes from experience.

This best advice for a new gardener is to take plenty of notes on the problems that you may face so that you can learn to properly treat it and then work on methods to prevent it for the next year.

Eventually you will gain plenty of knowledge on the topic of vegetable garden problems and issues that you can be one step ahead of them.

While dealing with these types of issues can be frustrating and dissapointing, the energy put into growing a garden that produces fresh food for your family is well worth it.


Dreaming of Having a Vegetable Garden this year?

Grab the Your Dream Vegetable Garden Plan for FREE to get you started today!  Start growing your groceries this year!

Easy Homemade Ant Killer that Works Immediately

Easy Homemade Ant Killer that Works Immediately

It never fails, every year in the late winter, early spring – or February/March, we get ants.  They primarily show up in our kitchen and I hate them.

They are the most annoying thing when you are trying to cook.  Dodging the ants when cutting vegetables and having to remember to wipe down counters after doing ANYTHING is just plain annoying!

I really try not to use any toxic chemicals when cleaning my house but when it comes to pest control, I have a hard time resisting the urge to wipe them out with whatever means are necessary.

A few days ago, I had just had it with the ants that had started showing up in my kitchen.  For a few weeks I dealt with them but I just couldn’t take it anymore.

I searched for natural any killer and found a few solutions.

This easy solution worked wonders for me.  A few days later and I have yet to see a single ant.  This beats calling an exterminator any day!

When I first found this solution, I was a little worried about using borax because it can be toxic in large doses.

For this reason, I try not to use it in cleaning solutions and for other purposes that extend to rooms and surfaces that my kids have access to. However, this recipe calls for a small amount and since I will only (hopefully) be using it once a year, it is definitely worth it.

Borax, also known as sodium borate, can be found in cleaners such as laundry detergent boosters.  It can be toxic in very large dosages.

For more information about the safety of borax, this article from Wellness Mama does a good job breaking down the reality of using borax so that you can make the best decision for your house.

Grab the Printable Ant Killer Recipe

This Ant Killer is SO effective, you WILL want to share it with a friend or use it for future outbreaks!

Get the printable version delivered right to your inbox so you don’t have to find it again!

Step 1. Mix together a 3:1 ratio of sugar to borax

I do not like making more than I need and you really don’t need to much. I used 3 tablespoons of sugar to 1 tablespoon of borax.  You can find borax in the grocery story or any at drug store and it is relatively inexpensive.

Step 2. Add a little water at a time to create a paste like consistency.

I did not really measure the water before adding.  I simply added a little at a time until I got a consistency that was paste like but could be soaked up my the cotton balls.

Step 3) Soak Cotton balls in the solution

Step 3: Soak cotton balls in the solution. Make sure they are covered in the paste.  I did four cotton balls so that I could test where the ants were coming from.

Step 4) Place cotton balls on plate or other surface that ants can easily get to.

Place cottonballs on plate or other surface that ants can easily get to.  I place several in different areas of my kitchen counter.  I even put one in my dishwasher because I could swear that was where they were coming from.

Step 5) Determine where the ants are coming from

After maybe a couple of hours, you should start to see the ants swarming.  It is pretty gross but luckily ants pretty much stick to a single file line.  The idea behind this method is that the ants are attracted to the sugar but will take pieces of borax back to the nest and feed to to the others, this should kill the entire nest.

Once the ants start to swarm, it should be pretty easy to determine where they are coming from.

I could have sworn that our ants were coming in from around out dish washer but we could quickly tell that they were actually coming in through a crack in our wood floor.

Step 6) Plug their entryway with cinnamon

I know.. it sounds crazy.  But it really works!

Cinnamon repels ants so if you plug thier entryway with it, they won’t return.

We found that the ants were coming in around trim of a doorway where it meets the floor boards.  I just spinkled some cinamon into those cracks and it worked like magic!

A week later and I haven’t seen a single ant! What a relief, hopefully the results are long term but even as a short term fix, this method really works!

Ultimate Homemade Ant Killer Recipe

Directions

Step 1: Mix together a 3:1 ratio of sugar to borax.

I do not like making more than I need and you really don’t need to much. I used 3 tablespoons of sugar to 1 tablespoon of borax.

Step 2: Add a little water at a time to create a paste like consistency.

Step 3: Soak cottonballs in the solution. Make sure they are covered in the paste.

Step 4: Place cottonballs on plate or other surface that ants can easily get to.  I place several in different areas of my kitchen counter.  I even put one in my dishwasher because I could swear that they were coming in through it.

Step 5: Determine where the ants are coming from.

Step 6: Plug their entryway with cinnamon.

Grab the Printable Ant Killer Recipe

This Ant Killer is SO effective, you WILL want to share it with a friend or use it for future outbreaks!

Get the printable version delivered right to your inbox so you don’t have to find it again!

3 Hot Chocolate Recipes for Every Occasion

3 Hot Chocolate Recipes for Every Occasion

If you are anything like me, the winter season basically means “hot drink season”, and for my kids, that means hot chocolate.

We all love hot chocolate in my family and up until recently, that meant stocking up on packaged powdered hot chocolate.  If I am feeling really fancy, I might pick up a more expensive brand than Swiss Miss but that was always our go to.

Since I have really been trying to replace store bought products with from scratch versions, I thought that hot chocolate would be an awesome one to try this winter.


In my hunt for the best hot chocolate recipe, I came across so many!

What I found is that the recipe that you use really depends on how many people you are serving and how much time you have!

I found three awesome hot chocolate recipes that I am sharing with you here.  Regardless of the event or how many people you are serving, I have a recipe for you.

I am sharing a powdered mix to keep on hand, a stovetop version, for a few cups on a special evening, and a slow cooker version to prepare for a larger amount of people just perfect for your holiday party!

Whether you are serving for a large group at a party, or want to make a quick cup for your kids, there is a recipe here!

Enjoy!

1. Powdered Pantry Version

The first recipe that I am sharing is a great recipe to substitute your powdered packaged mix.  With little kids, I do not want to make a large batch of stovetop hot chocolate to only hand out ½ cups of lukewarm chocolate milk.

This recipe is great to mix up at the beginning of the season and have on hand.

I originally found this from scratch recipe over at Little House Living but I feel like it is still a little bitter so you can add gradulated sugar or powdered sugar to each cup to up the sweetness if needed.


  • 1 cup unsweetened Cocoa Powder

  • 2/3 cup sugar

  • 1/2 teaspoon Salt

I doubled the recipe and put it in a Mason Jar for the season. Add 1-2 Tbls to a cup of warm milk and whisk until blended.

While I am not a fan of powdered sugar hot chocolate, sometime it is hard to wisk in without leaving chucks, and it is never really creamy, this recipe definitely serves the purpose of a quick hot chocolate for the kids.

It does help to sift the mix before putting it into the milk, this breaks up the powder and removes large chucks.

Powdered Hot Chocolate

Ingredients

  • 1 cup Unsweetened Cocoa Powder
  • 2/3 cup Sugar
  • 1/2 tsp Salt

Instructions

  1. Mix together ingredients and place in mason jar.

  2. Can stay on self for several months.

  3. Add 1 T to 1 cup of warm milk and wisk.

  4. To prevent clumps, sift the mixture while adding to milk.

Your 1st Step to a Simple Living Lifestyle!


A great place to start with Simple Living is to start making your own cleaning and personal products!

With this FREE eBook, you can easily get started with over 10 quick but effective recipes that use ingredients you already have in your house!

2) Stove top Version

Now if I want to enjoy some hot chocolate, I go for the stove top version.

This recipe is super easy and so good.  If you don’t have heavy cream on hand, you can leave it out but it does give a really great creaminess to the drink.

This is not my original recipe, I found it and have been using it for awhile.  I am not sure where I found it but I did make a few adjustments along the way.

  • 2 cups milk

  • ¼ cup heavy cream

  • 1 cup semi-sweet chocolate chips

  • 1 tsp vanilla

  • Powdered sugar

Bring milk and heavy cream to heat, just under a boil.

Melt chocolate chips in the microwave and add to the heated milk

Wisk until blended

Add vanilla

Add powdered sugar if it needs to be sweetened.

Pour into mugs and enjoy!

Stove Top Hot Cocoa

Servings 4 servings

Ingredients

  • 2 cups Milk
  • 1/4 cup Heavy Cream
  • 1 cup Semi-sweet Chocolate Chips
  • 1 tsp Vanilla extract
  • Powdered sugar

Instructions

  1. Bring milk and heavy cream to heat, just under a boil. Do not let it boil.

  2. Melt chocolate chips in the microwave and add to the heated milk.

  3. Wisk until blended.

  4. Add vanilla extract.

  5. Add powdered sugar if it needs to be sweetened.

Your 1st Step to a Simple Living Lifestyle!


A great place to start with Simple Living is to start making your own cleaning and personal products!

With this FREE eBook, you can easily get started with over 10 quick but effective recipes that use ingredients you already have in your house!

3) Slow Cooker Hot Chocolate

This slow cooker recipe, perfect for a party or large number of people and has been a real hit the time I have made it.


  • 1 1/2 c. semi-sweet chocolate chips

  • 1/4 c. cocoa powder

  • 1/2 c. sugar

  • 1 tsp. vanilla extract

  • 1 c. heavy cream

  • 6 c. whole milk

Put all ingredients in a slow cooker and put on high for the first hour. Stir it occasionally and lower the heat if it is getting too hot.

I kind of had to monitor it a little because low did not allow it to get warm enough but putting in on high was too much after awhile.

Once chocolate is melted and it is warm, serve. Initially, it was just a tad too bitter for my taste so add some powdered sugar until the sweetness is too your liking, not too much though!

Add whipped cream, marshmallows, peppermint schnapps

Can store for a few days in the fridge.

Slow Cooker Hot Chocolate

Cook Time 2 hours

Ingredients

  • 6 Cups Whole milk
  • 1 Cup Heavy Cream
  • 1/2 Cup Sugar
  • 1 1/2 Cup Semi-sweet Chocolate chips
  • 1/4 Cup Cocoa Powder
  • 1 tsp Vanilla extract

Instructions

  1. Put all ingredients in a Slow Cooker and put on high for the first hour.

  2. Stir it occasionally and lower the heat if it is getting too hot.

  3. I had to monitor it a little because low did not allow it to get warm enough but putting in on high was too much after awhile.

  4. Once chocolate is melted and it is warm, about two hours. Serve in mugs.

  5. Initially, it was just a tad too bitter for my taste so add some powdered sugar until the sweetness is too your liking, not too much though!

  6. Add whipped cream, marshmallows, peppermint schnapps, or peppermint sticks.

  7. Can store for a few days in the fridge.

Your 1st Step to a Simple Living Lifestyle!


A great place to start with Simple Living is to start making your own cleaning and personal products!

With this FREE eBook, you can easily get started with over 10 quick but effective recipes that use ingredients you already have in your house!